Saturday, October 13, 2012

Homemade Stevia Syrup

Posted by Jaime W. in Chemical-Free Living, Living on pennies, Recipes

August 30, 2012

So, I had this brilliant idea while walking around a plant nursery early this spring. On a shelf near the herb section, I saw a little stevia plant. Stevia! I can grow my own stevia! It’s natural! It’s fairly easy to grow! It’s not horribly fatsy like sugar! I’ll never have to buy sweetener again!

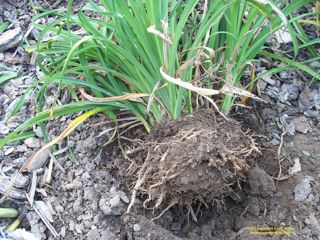
Here’s my (somewhat overgrown) stevia plant, next to my cute little basil plant.

Proud of my genius, I made the investment—I bought the plant. I’d love it. I’d nurture it. I’d have it forever, and I’d never ever ever have to buy stevia in any form again. It was going to be awesome.

It wasn’t until a few weeks later, when the plant started to grow so large that it was flopping over the edges of the pot, that I suddenly realized—wait, what do I do with this, exactly? I asked around a bit, and got the same exact enthusiastic answer from five different trusted gardeners. “Throw a few leaves in with your iced tea!” Okay, yes, that’s great—but seriously, how much iced tea can a person drink? Besides, that eliminated my need for sugar in exactly one recipe—not even a recipe I made very often!

I finally decided to trim and dry a few of the leaves. I’d done it a few years before with my excess fresh basil, and it was simple enough. I’d just use what I could fresh, and dry the rest! Problem solved, right? Except what in the world do I do with dried stevia leaves? More tea??? No. I need something more flexible. I need something that I can add to recipes without it looking like I’ve poured Italian seasoning in my dessert. I had to find a way to make my stevia more versatile.

Get ready for this: Stevia Syrup! Perfect for adding to tea, coffee, lemonade, smoothies, fruit crisps and cobblers, pie fillings, homemade yogurts and kefirs, your morning oatmeal—if it won’t miss the added bulk of sugar (some recipes do need that 1 cup of sugar, because it fills out the recipe), stevia syrup will work. There are even recipes for baked goods that use only stevia (or mostly stevia) as the sweetener. It’s up to 200 times sweeter than sugar, so you only need a tiny bit—it won’t add too much liquid to your recipes.

I let my coarsely chopped stems and leaves soak (covered) for about 36 hours.

Here’s the recipe:

3 c. of distilled (purified) water

3 c. of chopped stevia leaves and stems (loosely packed)

Place the chopped leaves in a glass container and add 1 c. of the water. Cover tightly and let sit  for 24 hours. Test for sweetness. If it isn’t sweet enough, give it another 12 to 24 hours. Strain it into a pan (ceramic is best),and bring to a simmer. Let simmer for 20 minutes; cool.

The longer it reduces, the more potent the sweetness.

Don’t get greedy with the sweetness. I was tempted to do it, too. “If letting it sit longer makes it sweeter, I’ll let it sit all week!” Not a good idea, evidently. Ever had something sweetened with stevia that had a funky, bitter aftertaste? It’s because someone got greedy. Don’t let it sit any longer than 48 hours—and less is more!

It’s a very earthy green color–but that just means more nutrients! Don’t worry, it won’t dye your food.

This needs to be refrigerated, and it will last at least a few weeks in the fridge. To keep the batches coming even when your lil’ stevia guy goes into slow winter growth mode, dry leaves when you have an abundance, and use the dried leaves to make fresh batches of syrup. The strength probably won’t be identical, so check it a few times during steeping.

I put about a spoonful in my plain yogurt (see the green?), and it was just the right amount of sweetness.

Stevia powder is another option—and it’s a bit simpler, too. Just dry the leaves and then grind them with a mortar and pestle, or a coffee grinder if you have one. The powder will work just like the syrup does—provided you don’t mind the green color and the texture of the powder in your food and drink (which I do, hence the syrup).

I hope you try it, and here’s to healthier eating habits!

Tuesday, October 2, 2012

Extending Your Growing Season with Mini Greenhouses

 
From Gardner Scott    http://gardenerscott.blogspot.com/2011/03/extending-your-growing-season-with-mini.html
 
Gaining a few extra weeks in your growing season might make the difference between harvesting a handful of tomatoes and harvesting a bushel. With a little effort and not much money, you can add weeks to your season on both the front side and the back.
I strongly advocate raised beds if you want an extended season. The soil in raised beds thaws out faster in the spring. After a few recent warm days I tested my soil yesterday. The soil in open areas that receive full sun is still frozen below about two inches. The soil in my raised beds is thawed down to six to eight inches, depending on how much sun they get. Raised beds are also ideal for mini greenhouses.

A mini greenhouse over my raised bed.
A mini green house is a simple structure that is built over the raised bed, or in the garden, and covered with plastic. It lets the sun's rays through during the day and traps radiant heat at night.
Mini greenhouses will warm the soil faster, help retain heat through the night, and protect plants during the variable days of late spring. The last two to three weeks before your last frost date (see my blog "Know Your Important Garden Dates";  Jan 20, 2011) may still present a few nights where the temperatures drop below freezing. The extra protection makes a big difference; studies by Colorado State Universityshowed a plastic-covered frame provided three to six degrees of frost protection. That's all you need to plant early and not be worried.
I built my mini greenhouses as "hoop houses" using 1/2" PVC pipe. In my four feet by eight feet raised beds, I installed 3/4" pipe "C" clamps every two feet along the side edges of the bed. Take a 10-feet long PVC pipe and bend it between the clamps. This forms a hoop. An eight-foot long, 1" x 2" board can be screwed to the hoops at the top center to form a backbone that holds them in place.

The clamps that hold the PVC pipe in place.
Cover the hoops with a sheet of plastic. Plastic that is 10-feet wide is a perfect fit for the hoops. You want to trim it long enough to fully cover the ends of the mini greenhouse. For an eight-feet long bed, plan your plastic to be at least 14 feet long; that allows an extra three feet on each end that can be folded around to cover the end. I used 16-feet long strips to completely enclose the beds.
I used spring hand clamps at the ends to hold the plastic ends together. If you want the ends to be open for air flow, you can also use clamps to hold the plastic to the hoops or to the raised bed. To help keep the plastic in place during windy conditions, I stapled eight-feet long, 1" x 3" tacking strips to the center sides of the plastic; they hang at the sides of the bed.

Spring clamps holding the plastic together.
My mini greenhouses are in place now to warm the soil. As soon as the soil is completely thawed I can start planting cool season plants like peas and lettuce. We'll still have nights below freezing through April, but the extra protection should avoid serious plant damage. To plant, you just slide the plastic off one side; you can clamp it at the top. You can also plant and water from each end without removing the plastic sheet.
If you use ten-feet long PVC pipe, your hoops will be about four feet tall. That should be big enough for most garden plants that need early and late protection. If you want a shorter mini greenhouse, eight-feet long pipe will make hoops about three feet tall.

Two different sizes of hoops.
When the days begin to get hot, you'll need to be sure to open the ends of the mini greenhouse when the sun is out. This helps ensure air flow and will keep young plants from frying. Close the ends before the sun goes down to retain the warmth in the soil.
The mini greenhouses should stay covered with plastic until the nights remain warm enough for the plants under the hoops. You can leave the plastic in place throughout the growing season, but it may create too much heat for the plants and can reduce pollination. I remove the plastic in early June when the days and nights are consistently warm. If hail is in the forecast I can quickly bring the plastic out and cover the hoops to prevent plant damage.
If you've matched the size of the plant to the size of the hoop, you can put the plastic back on to extend the growing season on the backside. In late summer and early fall, the mini greenhouses keep the temperatures warm when the nights begin to cool. You should be able to coast through your first frost with the plants protected and buy another couple weeks of harvest.
The total cost for each mini greenhouse was about $20 with supplies from a garden center. The PVC and plastic will gradually break down in the sun, but should last at least two full seasons. That seems to be a good investment for getting much more produce from the garden.
You can see a quick recap of the entire process on this YouTube video I made. Enjoy extending your growing season.
"How to Build a Hoophouse Mini Greenhouse" with Gardener Scott
Know Your Important Garden Dates";  Jan 20, 2011) may still present a few nights where the temperatures drop below freezing. The extra protection makes a big difference; studies by Colorado State University showed a plastic-covered frame provided three to six degrees of frost protection. That's all you need to plant early and not be worried.
I built my mini greenhouses as "hoop houses" using 1/2" PVC pipe. In my four feet by eight feet raised beds, I installed 3/4" pipe "C" clamps every two feet along the side edges of the bed. Take a 10-feet long PVC pipe and bend it between the clamps. This forms a hoop. An eight-foot long, 1" x 2" board can be screwed to the hoops at the top center to form a backbone that holds them in place.

The clamps that hold the PVC pipe in place.
Cover the hoops with a sheet of plastic. Plastic that is 10-feet wide is a perfect fit for the hoops. You want to trim it long enough to fully cover the ends of the mini greenhouse. For an eight-feet long bed, plan your plastic to be at least 14 feet long; that allows an extra three feet on each end that can be folded around to cover the end. I used 16-feet long strips to completely enclose the beds.
I used spring hand clamps at the ends to hold the plastic ends together. If you want the ends to be open for air flow, you can also use clamps to hold the plastic to the hoops or to the raised bed. To help keep the plastic in place during windy conditions, I stapled eight-feet long, 1" x 3" tacking strips to the center sides of the plastic; they hang at the sides of the bed.

Spring clamps holding the plastic together.
My mini greenhouses are in place now to warm the soil. As soon as the soil is completely thawed I can start planting cool season plants like peas and lettuce. We'll still have nights below freezing through April, but the extra protection should avoid serious plant damage. To plant, you just slide the plastic off one side; you can clamp it at the top. You can also plant and water from each end without removing the plastic sheet.
If you use ten-feet long PVC pipe, your hoops will be about four feet tall. That should be big enough for most garden plants that need early and late protection. If you want a shorter mini greenhouse, eight-feet long pipe will make hoops about three feet tall.

Two different sizes of hoops.
When the days begin to get hot, you'll need to be sure to open the ends of the mini greenhouse when the sun is out. This helps ensure air flow and will keep young plants from frying. Close the ends before the sun goes down to retain the warmth in the soil.
The mini greenhouses should stay covered with plastic until the nights remain warm enough for the plants under the hoops. You can leave the plastic in place throughout the growing season, but it may create too much heat for the plants and can reduce pollination. I remove the plastic in early June when the days and nights are consistently warm. If hail is in the forecast I can quickly bring the plastic out and cover the hoops to prevent plant damage.
If you've matched the size of the plant to the size of the hoop, you can put the plastic back on to extend the growing season on the backside. In late summer and early fall, the mini greenhouses keep the temperatures warm when the nights begin to cool. You should be able to coast through your first frost with the plants protected and buy another couple weeks of harvest.
The total cost for each mini greenhouse was about $20 with supplies from a garden center. The PVC and plastic will gradually break down in the sun, but should last at least two full seasons. That seems to be a good investment for getting much more produce from the garden.
You can see a quick recap of the entire process on this YouTube video I made. Enjoy extending your growing season.
"How to Build a Hoophouse Mini Greenhouse" with Gardener Scott

Friday, September 28, 2012

Can you say “Green Tomato Cake”?


225 Roma type tomatoes and 100 of the best eating tomatoes called Paul Robeson.

2012-09-27 05.12.27_thumb[4]

From Seeds of Change catalog:

Paul Robeson - Lycopersicon esculentum – Heirloom - Tender Annual

8-10 oz. (85-90 days) The rare "black" with red flesh. Rated "Best of Show" at the Carmel Tomato Fest, it has received rave reviews for its earthy flavor with the perfect acid/sweet balance.

2012-09-19 21.45.14_thumb[2]

Picture with pepper and tomato for contrast… they really ARE that color!

How to Make Homemade Yeast

What’s surprising is that yeast occurs naturally on the skins most fruits (dried or fresh), vegetables, even herbs found in the wild (like Mint) and can be easily cultivated the same way using the following procedure:


Step 1: Fill a glass jar up to a quarter to a half full with your sliced fruit, vegetable, or herb (I used apples from my apple tree). If you are using fruits (apples or grapes are both excellent to try first) or vegetables be sure that the skin is not peeled off.


Step 2: Fill the rest of the jar up with water until you are about 3/4 of the way full.


Step 3: Close the jar and leave in a warm area (in the sun or by a stove) for around 3 days or until a good amount of bubbles start forming (the bubbles indicate that the yeast is reacting with the carbohydrates in your fruit, veggie etc).


Here’s a close-up view of the finished yeast water.


Step 4: Use your yeast water in place of the water called for in your bread recipe.


Step 5: Knead your bread as usual and let it sit…


Step 6: Until it rises — just like you were using commercial yeast!

Step 7: Bake and enjoy!

Thursday, September 27, 2012

tomatoes….

Yup.. we got ‘em!  I think there were 300 at the end of the season… 

2012-09-24 12.58.41    2012-09-24 12.56.04

2012-09-27 05.12.27

Green Tomato Cake

OK…  I think the decision has been made…  bring the green tomatoes into the house and make cakes and freeze them!  The recipe is for the second picture but – oh my – check it out with cream cheese icing!!  YUM…

Ingredients:
  • 2c. white sugar
  • 1c. brown sugar 
  • 1 cup vegetable oil (or 1 c, pumpkin) 
  • 3 eggs (3/4 c. egg substitute)
  • 2 teaspoons vanilla
  • 3c. flour
  • 1c. whole oats coarsely ground
  • 1 teaspoon salt
  • 2 teaspoon baking powder
  • 1 tsp. cinnamon
  • 1 tsp. nutmeg or allspice
  • 1 cup pecans or walnuts
  • 1 cup raisins or craisins
  • 3c. pureed green tomatoes
Preparation:
  1. Preheat oven to 350°.
  2. In mixing bowl, beat sugars, vegetable oil, eggs and vanilla until smooth and creamy.
  3. Sift together the flour, oats, salt, baking powder, cinnamon and nutmeg.
  4. Slowly beat into egg mixture. Blend well.
  5. Stir in walnuts, raisins and tomatoes.
  6. Pour into greased 9x13-inch pan.
  7. Top with coconut if desired.
  8. Bake for one hour, or until a wooden pick or cake tester inserted in center comes out clean.
  9. Serves 12.

Wednesday, September 26, 2012

Blueberry bushes

Blueberry bushes I lovingly planted with good dirt, etc.(first 2)

2012-09-27 13.32.08

2012-09-27 13.31.57

Blueberry bushes Ernesto planted while I was in the hospital
by digging a hole, putting the plant in the hole and putting
the same clump of grass back that he dug out!   SmileSmile

2012-09-27 13.31.26

2012-09-27 13.31.46

Sunday, September 23, 2012

helping again….

I wonder what they have found?

2012-09-23 18.03.30

2012-09-23 18.04.19

Friday, September 21, 2012

Good to know what these look like!

Friday, September 14, 2012

Green tomatoes

Yesterday I counted about 200 green tomatoes on the plants…  hhmmm…

  • fried green tomatoes
  • green tomato salsa
  • green tomato BREAD???
  • Green Tomato Bread

    • ½ cup canola oil
    • 8 ounces nonfat yogurt, plain
    • 3 large eggs
    • 1 cup sugar
    • 1 cup Splenda (or use all sugar)
    • 2 cups green tomatoes, pureed, juice drained and discarded
    • 2 cups all-purpose flour
    • 1 cup whole wheat flour
    • ½ teaspoon baking powder
    • 1 teaspoon baking soda
    • 2 teaspoons cinnamon
    • ½ teaspoon ground nutmeg
    • ⅛ teaspoon salt
    • ½ teaspoon ground cloves

    Instructions --------Preheat oven to 350 degrees. Grease and flour two loaf pans. Combine oil, yogurt, eggs, sugar, Splenda and green tomatoes in a large bowl and mix well. Sift together all purpose flour, baking powder, baking soda, and spices and add to wet ingredients along with the whole wheat flour. Stir together just until combined. Divide evenly between two prepared pans and bake just until a toothpick comes clean from the center of the bread, about 45 minutes. Let cool in pans, then remove. To retain moisture, wrap in plastic wrap and store in the refrigerator. May be frozen.

    Dandelion


    Overview:

    While many people think of the dandelion (Taraxacum officinale) as a pesky weed, herbalists consider it a valuable herb that can be used as a food and medicine. Dandelion is a rich source of vitamins A, B complex, C, and D, as well as minerals such as iron, potassium, and zinc. Dandelion leaves are used to add flavor to salads, sandwiches, and teas. The roots are used in some coffee substitutes, and the flowers are used to make wines.

    Traditionally, dandelion roots and leaves were used to treat liver problems. Native Americans also boiled dandelion in water and took it to treat kidney disease, swelling, skin problems, heartburn, and upset stomach. In traditional Chinese medicine, dandelion has been used to treat stomach problems, appendicitis, and breast problems, such as inflammation or lack of milk flow. In Europe, it was used in remedies for fever, boils, eye problems, diabetes, and diarrhea.

    So far, there have not been any good quality scientific studies on dandelion. Today, the roots are mainly used as an appetite stimulant, and for liver and gallbladder problems. Dandelion leaves are used as a diuretic to help the body get rid of excess fluid.

    Plant Description:

    Hundreds of species of dandelion grow in the temperate regions of Europe, Asia, and North America. Dandelion is a hardy perennial that can grow to a height of nearly 12 inches. Dandelions have deeply notched, toothy, spatula-like leaves that are shiny and hairless. Dandelion stems are capped by bright yellow flowers. The grooved leaves funnel rain to the root.

    Dandelion flowers open with the sun in the morning and close in the evening or during gloomy weather. The dark brown roots are fleshy and brittle and are filled with a white milky substance that is bitter and slightly smelly.

    Parts Used:

    Dandelion leaves act as a diuretic, increasing the amount of urine the body produces. The leaves are used to stimulate the appetite and help digestion. Dandelion flower has antioxidant properties. Dandelion may also help improve the immune system.

    Herbalists use dandelion root to detoxify the liver and gallbladder, and dandelion leaves to support kidney function.

    Medicinal Uses and Indications:

    Traditionally, dandelion has been used a diuretic, to increase the amount of urine the body produces in order to get rid of excess fluid. It has been used for many conditions where a diuretic might help, such as liver problems and high blood pressure. However, there is no good research on using dandelion as a diuretic in people.

    Fresh or dried dandelion herb is also used as a mild appetite stimulant and to improve upset stomach. The root of the dandelion plant may act as a mild laxative and has been used to improve digestion. There is some very preliminary research that suggests dandelion may help improve liver and gallbladder function, but the study was not well designed.

    Some preliminary animal studies also suggest that dandelion may help normalize blood sugar levels and lower total cholesterol and triglycerides while raising HDL, "good," cholesterol in diabetic mice. But not all the animal studies have found a positive effect on blood sugar. Human studies are needed to see if dandelion would work in people.

    A few animal studies also suggest that dandelion might help fight inflammation.

    Available Forms:

    Dandelion herbs and roots are available fresh or dried in a variety of forms, including tinctures, liquid extract, teas, tablets, and capsules. Dandelion can be found alone or combined with other dietary supplements.

    How to Take It:

    Pediatric

    Ask your doctor before giving dandelion supplements to a child, so your doctor can help you determine the dose. Eating dandelion in food is safe for a child.

    Adult

    Ask your doctor to help you determine the right dose for you. Some traditional doses include:

    • Dried leaf infusion: 1 - 2 teaspoonfuls, 3 times daily. Pour hot water onto dried leaf and steep for 5 - 10 minutes. Drink as directed.
    • Dried root decoction: 1/2 - 2 teaspoonfuls, 3 times daily. Place root into boiling water for 5 - 10 minutes. Strain and drink as directed.
    • Leaf tincture (1:5) in 30% alcohol: 30 - 60 drops, 3 times daily
    • Standardized powdered extract (4:1) leaf: 500 mg, 1 - 3 times daily
    • Standardized powdered extract (4:1) root: 500 mg, 1 - 3 times daily
    • Root tincture (1:2) fresh root in 45% alcohol: 30 - 60 drops, 3 times daily
    Precautions:

    The use of herbs is a time-honored approach to strengthening the body and treating disease. Herbs, however, contain components that can trigger side effects and interact with other herbs, supplements, or medications. For these reasons, you should take herbs with care, under the supervision of a health care provider.

    Dandelion is generally considered safe. Some people may develop an allergic reaction from touching dandelion, and others may develop mouth sores.

    If you are allergic to ragweed, chrysanthemums, marigold, chamomile, yarrow, daisies, or iodine, you should avoid dandelion.

    In some people, dandelion can cause increased stomach acid and heartburn. It may also irritate the skin if applied topically.

    People with kidney problems, gallbladder problems, or gallstones should ask their health care provider before eating dandelion.

    Possible Interactions:

    Dandelion leaf may act as a diuretic, which can speed up how fast drugs leave your system. If you are taking prescription medications, ask your health care provider before taking dandelion leaf. If you are currently being treated with any of the following medications, you should not use dandelion without first talking to your health care provider:

    Antacids -- Dandelion may increase the amount of stomach acid, so antacids may not work as well.

    Blood-thinning medications -- Theoretically, dandelion may increase the risk of bleeding, especially if you already take blood-thinners such as aspirin, warfarin (Coumadin), or clopidogrel (Plavix).

    Diuretics (water pills) -- Dandelion may act as a diuretic, increasing the amount of urine to help your body get rid of excess fluid. If you also take prescription diuretics or other herbs that act as diuretic, you could be at risk for an electrolyte imbalance.

    Lithium -- Animal studies suggest that dandelion may make the side effects of lithium worse. Lithium is used to treat bipolar disorder.

    Ciproflaxin (Cipro) -- One species of dandelion, Taraxacum mongolicum, also called Chinese dandelion, may lower the absorption of the antibiotic ciproflaxin from the digestive tract. Researchers don' t know whether the common dandelion would do the same thing.

    Medications for diabetes -- Theoretically, dandelion may lower blood sugar levels. If you take medications for diabetes, taking dandelion may increase the risk of low blood sugar.

    Alternative Names:

    Lion's tooth; Priest's crown; Swine's snout; Taraxacum officinale

    • Reviewed last on: 1/2/2011
    • Steven D. Ehrlich, NMD, Solutions Acupuncture, a private practice specializing in complementary and alternative medicine, Phoenix, AZ. Review provided by VeriMed Healthcare Network.

    Read more: http://www.umm.edu/altmed/articles/dandelion-000236.htm#ixzz29HVGfO4B

    Wednesday, September 12, 2012

    Medicinal Uses of Common Dandelion


    Gardens Ablaze gives a very nice summary of the many health benefits of the common dandelion:

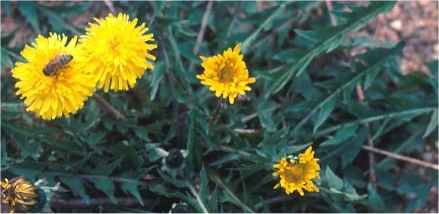
    The humble little Dandelion has remarkable nutritional value, being very high in vitamins A and C, with more beta carotine than carrots and more potassium than broccoli  or spinach, not to mention healthy doses of iron and copper for good measure.  Medicinally, Dandelions are considered very safe and effective as a general tonic that helps strengthen the liver, gallbladder, pancreas, spleen, stomach, and intestines,  improving bile flow and reducing inflammation in cases of hepatitis and cirrhosis.  Dandelions also help to dissipate gallstones and are believed to improve kidney function, thereby improving overall health and clearing skin problems.

    Dandelion tea is the perfect choice for those with the above problems or those who lead relatively sedentary lifestyles and who experience discomfort associated with this, such as constipation, digestive disorders, indigestion,  and general sluggishness and fatigue.  Just one cup per day will yield noticeable results within the first few months.  Tea may also be of benefit for many of the problems associated with diabetes and low blood sugar. 

    Externally, the white sap from the stems or roots can be applied directly to ease the pain of sores and bee stings, and is useful in the elimination of warts, acne, and calluses.

    Dandelion coffee is made by grinding roasted roots, and makes a nice substitute for regular coffee, but without the caffeine (see main Dandelionpage for instructions).  People who can't tolerate much coffee can drink as much as they please and reap the health benefits without any side-effects.  For the sweets lover, ground root mixed with warm milk and a little sweetener makes a very tasty and nutritious creamy beverage with few calories.

    Although dandelion is generally considered safe, like any food/herb it may cause reactions in some individuals. The University of Maryland Medical Center offers a more detailed explanation of medicinal uses of dandelion, along with potential drug interactions.

    Saturday, September 8, 2012

    bowling bowl art… who knew!!!

    ….Now I know what I can do with that bowling ball that’s been floating around in my yard all summer!!

    bowling bowl art          bowling bowl art3     bowling bowl art2

    Wednesday, September 5, 2012

    Dehydrate …. why?

    Here are some things you can use dehydrated fruit for.

    • Breads such as banana bread, banana fig bread, pumpkin bread, pineapple and breakfast bread.
    • Muffins, strawberry and blueberry muffins
    • Fruit leather
    • Fruit butters such as apple, peach and pear butter
    • Pies, fruit
    • Fruit cobblers
    • Over dry cereal (instead of fresh)
    • Cookies and cookie filling
    • Cake fillings
    • Dried Fruit candy
    • Fruit Horns, a type of pastry
    • Fruit Fritters
    • Puddings
    • Trail Mix
    • Granola
    • And just plain eating

    Salsa!

    Well I should have taken a picture it was so pretty!

    Tomatoes: red, yellow, darker red (so good)
    Cherry tomatoes: red, yellow
    Tomatillos: purple, verde

    Not shown…  red and green peppers and peaches

    Chopped ‘em all up and added some already made salsa for flavoring and it was yummy!

    2012-08-31 08.09.36      2012-09-03 10.31.09

    Tuesday, September 4, 2012

    Rain all around…

    and Larsen has a 22% chance of precipitation ….  go figure…  this is why my soil is sandy I guess….

    image

    A day of ups and downs….

    ….for the tomato plants, that is!! 

    9:20 in the morning – not so bad…  will water later…

    2012-09-04 09.20.28

    4:00 in the afternoon!!  What happened?!?!  OMG!  Get the hose QUICK!!!

    2012-09-04 16.57.322012-09-04 16.57.432012-09-04 16.58.52

    Two hours after the watering and good thoughts!! (Picture immediately above and below are the back of the row of tomatoes.  What a difference!

    2012-09-04 18.39.502012-09-04 18.39.35

    Monday, September 3, 2012

    How to Propagate Daylilies

     
    From Gardner Scott  http://gardenerscott.blogspot.com/2011/09/how-to-propagate-daylilies.html
     
    Daylilies are a rugged perennial that can endure sustained neglect and still grace the gardenscape with beautiful strokes of color. I know because I've been a daylily abuser. They do so well in poor soil, harsh weather, bad light, and bone-dry conditions that it's easy to forget that they can thrive with a little help. With just moderate maintenance the plants will prosper and you'll realize you want more in your garden. That's no problem because daylilies are very easy to propagate.
    Daylily flowers provide a rainbow spectrum of color that bloom over a long period and the plants offer sizes that vary from small feathery clumps to large, fans of green foliage. Because of these differences in color and size, I've found that I occasionally plant with an aesthetic vision in mind but when the plants mature I want to adjust their positions and multiply the plants I especially like. Easy propagation is a godsend in those situations.

    Early summer in my new daylily bed
    There are only two primary forms of propagating daylilies. The first is by seed. After blooming and pollination, the flowers dry and a small, green seed pod develops at their base. The seed pod will grow over the course of a few months and the seed pods will turn brown as they mature. The brown pods will eventually crack open. Inside will be glossy black seeds. These young seeds need cold exposure to germinate so they should be planted in the fall for natural winter cold or they should be stored in the refrigerator in a plastic bag for about a month. After this cooling period they're ready to sow outside in spring.
    Collecting and sowing seeds from daylilies in your garden is a crapshoot. The daylilies you grow are probably hybrids. They won't grow true to the parent plant when grown from seed because it is a cross of other varieties. If you have multiple varieties of daylilies in your bed, there is no telling which flower pollinated another. With varied hybrid parents or different hybrid cultivars involved with pollination, the resulting seed will grow into an unknown, future plant.
    It can take three years for a seed to germinate and grow into a plant that flowers. After all that time, be ready for a surprise when the plant produces that first bloom. There's no way to tell what color or size it will be ahead of time, but with so many positive attributes that daylilies offer, it will probably be a nice surprise.
    If you don't plan to save the seeds, remove the seed pods. Plants that produce seeds will usually have fewer flowers the next year. Since one of the reasons you grow daylilies is for the flowers, there's no reason to intentionally restrict future flowers.
    The second form of daylily propagation is division. Large clumps of daylilies can be divided easily and this is the preferred method of propagation when you want your plant to have the same size and color as the parent. It also will produce flowers faster. Each plant grows into a clump that will be ready for division about every three or four years. Undivided plants will begin to produce fewer flowers so you're doing yourself and the plant a favor by dividing regularly.

    A plant I want to divide
    Daylilies can be divided in spring or fall. The plants that are divided in spring grow quickly afterward, but they seldom bloom in that first year. Primarily for that reason, I prefer to propagate in the fall. Fall propagated plants will almost always bloom the next year. You should wait until after the plant has flowered, but dividing and transplanting the divisions should happen at least six weeks before the ground freezes.
    Start by digging up the entire plant. Beginning about six to eight inches away from the plant, push your spade as deep as you can in a circle around the plant. Lift out the plant with the spade, trying to keep the rootball intact. This shouldn't be too difficult but larger plants may have roots deeper than the hole and can be torn in the process; that's okay, but try to avoid it.

    The intact clump
    Brush or wash away the soil attached to the roots to expose them. Many daylily roots are enlarged and tuberous. This is where the plant stores food and water and enables the divisions to grow well after transplanting. The more roots in the division, the better chance for survival of the transplant.
    You'll be able to see how the fans form distinctive and individual sections where they attach to the roots. Each of these sections can be pulled apart from the others. I find it easiest to begin by lightly shaking the plant and seeing where it begins to separate naturally. Then I gently pull apart the plant into two divisions. Often each of those divisions can be pulled into two or three additional divisions.

    Divisions after separating
    With larger plants and clumps, they may not separate with gentle pulling. You may need to slide two garden forks, back to back, in the middle of the clump and pry it apart. You can do the same with two spades but that causes more damage; garden forks reduce root damage. As soon as the divisions are smaller, they can usually be further divided by hand.
    Divisions should have three or four fans with stout roots attached. These will establish more quickly, grow into good clumps, and flower within a year. You can also divide to the point where you have individual fans with just five or six slender leaves. These individual fans can be transplanted with no problems but may take a few seasons before they reach a size where they will begin flowering.
    Some old, large clumps may have roots that are so extensive in the center that it is virtually a solid mass. These clumps may need to be cut apart with a garden knife or sharp spade. Try to cut in such a way that you keep the integrity of the individual fans intact.
    The divisions should be transplanted soon after digging up so the roots don't dry out. On each division, cut the leaves so that only five or six inches remain above thecrown. This reduces water loss and stress. The crown is the part where the leaves and roots meet and is usually cream colored. Place the plant in the hole with the crown about one inch below the surface level.

    Transplanting a division
    Daylilies do best in full sun in moist soil with organic matter added. If you can prepare the transplant area ahead of time with organic matter, do it. Adding a high phosphorus fertilizer will help stimulate root growth. If you're transplanting divisions among other, established plants, as I often do, at least add a handful of compost and fertilizer to the soil in the hole for each plant. Firm the soil around the roots and fill the hole.
    After the divisions are in the ground, water thoroughly. Keep the soil moist until the ground freezes. Use a few inches of mulch to moderate soil moisture and temperature levels. Mulch also reduces weeds and highlights the beauty of the plants.

    New divisions in place
    There is a third propagation method that is available for some varieties of daylily. Miniature plants may grow along the stem, or scape, of some daylilies. This miniature plant will form leaves, a crown, and even roots if left on the plant long enough. These miniature daylilies are called proliferations and are clones of the parent. The proliferations can be potted up or transplanted. Cut the scape above and below the proliferation. If roots haven't develped, dipping the crown in rooting hormone helps initiate root growth. None of the daylily varieties I grow form proliferations, so I don't have personal experience with this method.
    In time daylilies will form dense mats of plants. By dividing them you can keep the plants under control and looking their best. Propagation is a great way to expand their wonder to other areas. And don't forget that you may have many gardener friends who would love to have some of your extra divisions.