Wednesday, September 5, 2012

Dehydrate …. why?

Here are some things you can use dehydrated fruit for.

  • Breads such as banana bread, banana fig bread, pumpkin bread, pineapple and breakfast bread.
  • Muffins, strawberry and blueberry muffins
  • Fruit leather
  • Fruit butters such as apple, peach and pear butter
  • Pies, fruit
  • Fruit cobblers
  • Over dry cereal (instead of fresh)
  • Cookies and cookie filling
  • Cake fillings
  • Dried Fruit candy
  • Fruit Horns, a type of pastry
  • Fruit Fritters
  • Puddings
  • Trail Mix
  • Granola
  • And just plain eating

Salsa!

Well I should have taken a picture it was so pretty!

Tomatoes: red, yellow, darker red (so good)
Cherry tomatoes: red, yellow
Tomatillos: purple, verde

Not shown…  red and green peppers and peaches

Chopped ‘em all up and added some already made salsa for flavoring and it was yummy!

2012-08-31 08.09.36      2012-09-03 10.31.09

Tuesday, September 4, 2012

Rain all around…

and Larsen has a 22% chance of precipitation ….  go figure…  this is why my soil is sandy I guess….

image

A day of ups and downs….

….for the tomato plants, that is!! 

9:20 in the morning – not so bad…  will water later…

2012-09-04 09.20.28

4:00 in the afternoon!!  What happened?!?!  OMG!  Get the hose QUICK!!!

2012-09-04 16.57.322012-09-04 16.57.432012-09-04 16.58.52

Two hours after the watering and good thoughts!! (Picture immediately above and below are the back of the row of tomatoes.  What a difference!

2012-09-04 18.39.502012-09-04 18.39.35

Monday, September 3, 2012

How to Propagate Daylilies

 
From Gardner Scott  http://gardenerscott.blogspot.com/2011/09/how-to-propagate-daylilies.html
 
Daylilies are a rugged perennial that can endure sustained neglect and still grace the gardenscape with beautiful strokes of color. I know because I've been a daylily abuser. They do so well in poor soil, harsh weather, bad light, and bone-dry conditions that it's easy to forget that they can thrive with a little help. With just moderate maintenance the plants will prosper and you'll realize you want more in your garden. That's no problem because daylilies are very easy to propagate.
Daylily flowers provide a rainbow spectrum of color that bloom over a long period and the plants offer sizes that vary from small feathery clumps to large, fans of green foliage. Because of these differences in color and size, I've found that I occasionally plant with an aesthetic vision in mind but when the plants mature I want to adjust their positions and multiply the plants I especially like. Easy propagation is a godsend in those situations.

Early summer in my new daylily bed
There are only two primary forms of propagating daylilies. The first is by seed. After blooming and pollination, the flowers dry and a small, green seed pod develops at their base. The seed pod will grow over the course of a few months and the seed pods will turn brown as they mature. The brown pods will eventually crack open. Inside will be glossy black seeds. These young seeds need cold exposure to germinate so they should be planted in the fall for natural winter cold or they should be stored in the refrigerator in a plastic bag for about a month. After this cooling period they're ready to sow outside in spring.
Collecting and sowing seeds from daylilies in your garden is a crapshoot. The daylilies you grow are probably hybrids. They won't grow true to the parent plant when grown from seed because it is a cross of other varieties. If you have multiple varieties of daylilies in your bed, there is no telling which flower pollinated another. With varied hybrid parents or different hybrid cultivars involved with pollination, the resulting seed will grow into an unknown, future plant.
It can take three years for a seed to germinate and grow into a plant that flowers. After all that time, be ready for a surprise when the plant produces that first bloom. There's no way to tell what color or size it will be ahead of time, but with so many positive attributes that daylilies offer, it will probably be a nice surprise.
If you don't plan to save the seeds, remove the seed pods. Plants that produce seeds will usually have fewer flowers the next year. Since one of the reasons you grow daylilies is for the flowers, there's no reason to intentionally restrict future flowers.
The second form of daylily propagation is division. Large clumps of daylilies can be divided easily and this is the preferred method of propagation when you want your plant to have the same size and color as the parent. It also will produce flowers faster. Each plant grows into a clump that will be ready for division about every three or four years. Undivided plants will begin to produce fewer flowers so you're doing yourself and the plant a favor by dividing regularly.

A plant I want to divide
Daylilies can be divided in spring or fall. The plants that are divided in spring grow quickly afterward, but they seldom bloom in that first year. Primarily for that reason, I prefer to propagate in the fall. Fall propagated plants will almost always bloom the next year. You should wait until after the plant has flowered, but dividing and transplanting the divisions should happen at least six weeks before the ground freezes.
Start by digging up the entire plant. Beginning about six to eight inches away from the plant, push your spade as deep as you can in a circle around the plant. Lift out the plant with the spade, trying to keep the rootball intact. This shouldn't be too difficult but larger plants may have roots deeper than the hole and can be torn in the process; that's okay, but try to avoid it.
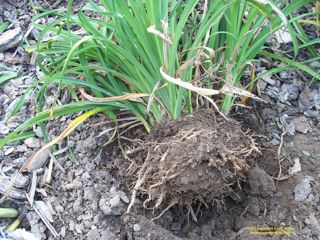
The intact clump
Brush or wash away the soil attached to the roots to expose them. Many daylily roots are enlarged and tuberous. This is where the plant stores food and water and enables the divisions to grow well after transplanting. The more roots in the division, the better chance for survival of the transplant.
You'll be able to see how the fans form distinctive and individual sections where they attach to the roots. Each of these sections can be pulled apart from the others. I find it easiest to begin by lightly shaking the plant and seeing where it begins to separate naturally. Then I gently pull apart the plant into two divisions. Often each of those divisions can be pulled into two or three additional divisions.

Divisions after separating
With larger plants and clumps, they may not separate with gentle pulling. You may need to slide two garden forks, back to back, in the middle of the clump and pry it apart. You can do the same with two spades but that causes more damage; garden forks reduce root damage. As soon as the divisions are smaller, they can usually be further divided by hand.
Divisions should have three or four fans with stout roots attached. These will establish more quickly, grow into good clumps, and flower within a year. You can also divide to the point where you have individual fans with just five or six slender leaves. These individual fans can be transplanted with no problems but may take a few seasons before they reach a size where they will begin flowering.
Some old, large clumps may have roots that are so extensive in the center that it is virtually a solid mass. These clumps may need to be cut apart with a garden knife or sharp spade. Try to cut in such a way that you keep the integrity of the individual fans intact.
The divisions should be transplanted soon after digging up so the roots don't dry out. On each division, cut the leaves so that only five or six inches remain above thecrown. This reduces water loss and stress. The crown is the part where the leaves and roots meet and is usually cream colored. Place the plant in the hole with the crown about one inch below the surface level.

Transplanting a division
Daylilies do best in full sun in moist soil with organic matter added. If you can prepare the transplant area ahead of time with organic matter, do it. Adding a high phosphorus fertilizer will help stimulate root growth. If you're transplanting divisions among other, established plants, as I often do, at least add a handful of compost and fertilizer to the soil in the hole for each plant. Firm the soil around the roots and fill the hole.
After the divisions are in the ground, water thoroughly. Keep the soil moist until the ground freezes. Use a few inches of mulch to moderate soil moisture and temperature levels. Mulch also reduces weeds and highlights the beauty of the plants.

New divisions in place
There is a third propagation method that is available for some varieties of daylily. Miniature plants may grow along the stem, or scape, of some daylilies. This miniature plant will form leaves, a crown, and even roots if left on the plant long enough. These miniature daylilies are called proliferations and are clones of the parent. The proliferations can be potted up or transplanted. Cut the scape above and below the proliferation. If roots haven't develped, dipping the crown in rooting hormone helps initiate root growth. None of the daylily varieties I grow form proliferations, so I don't have personal experience with this method.
In time daylilies will form dense mats of plants. By dividing them you can keep the plants under control and looking their best. Propagation is a great way to expand their wonder to other areas. And don't forget that you may have many gardener friends who would love to have some of your extra divisions.


Friday, August 31, 2012

What I learned….

Went to a series of classes 1.5 hours long over the last 2 months at the Waupaca County Extension office and really… I had a great time and learned lots!  Certainly worth the 5 afternoons I spent driving there (20-25 minutes one way – as easy as getting to Appleton).
Much of what I learned is what I do NOT want to do so I’ll start with that.
  • I don’t want to do canning…  water canning OR pressure canning.  Just don’t – thought I did but no.  Have taken my water canner back to Wal-Mart.  I’m sold on the jars however!
  • I don’t want to do pickling – no interest…. don’t really like the stuff. 
  • I don’t want to do freezing – what if the electric goes off then you lose everything…. and lord knows around here the electric goes off.
Pretty general but glad I discovered those things right now.  I may change my mind later but for now, that’s it!
Now…  what I do want to do:
  • I do want to make jam…  when I get berries from what I’ve planted….   grapes, blueberries, strawberries, blackberries, raspberries…  yum!  No this year however.
  • And I’m still sold on dehydrating and have been for a year now.  So far: peppers, sweet potatoes, tomatoes, leftover chili, apples and pears.  On the horizon – everything I just listed plus: oatmeal (cook then dehydrate so it can be used right away on cold cereal and rehydrated in milk); broccoli (think broccoli cheese soup); salsa, beans (same concept as oatmeal); peaches, bananas, and other fruit: carrots, pumpkin and maybe some herbs such as mint and now I learned to make “leathers” (fruit leathers as a treat and vegetable leathers (tomato sauce leathers for pizza)!
I bought some books (well worth the money) and each class had specific handouts for that class so I have lots of good reference materials.   The classes were $5 each and with each one except the dehydrating class we got 2-3 jars of whatever we did.  In the dehydrating class we had a great piece of pizza that was made with tomato sauce leather!  Good stuff!

Monday, August 27, 2012

Idea: stack for strawberry tower!

Saturday, August 25, 2012

Strawberries I think….

…. should go in here..  no…  maybe raspberries…  hhmmm…  well before anything is planted there has to be dirt!

2012-08-25 19.01.50

Friday, August 24, 2012

The future is now…

Doesn’t look like much now but I see strawberries, raspberries and blueberry bushes along this fence and some wildflowers surrounding the concrete blocks!

2012-08-24 00.30.27

2012-08-24 00.29.062012-08-24 00.29.39

Thursday, August 23, 2012

You see junk…

…  I see trellises….  $2 each for the ones that look like a deck railing and $1.50 each for the vertical ones! 

….and since I already had the truck to get the blocks I thought I might as well take advantage of the shelves for $5 each and the almost-new-I-can-believe-someone-would-get-rid-of-the-chairs-just-because-the-glass-table-blew-away lawn chairs that are REALLY comfortable!

2012-08-23 13.41.352012-08-23 13.41.572012-08-23 13.30.22

Wednesday, August 22, 2012

Concrete blocks!!

OMG!  I bought 54 concrete blocks at ReStore in Appleton today for $.25 each….  that’s twenty-five cents each!!  Can you say “RAISED BEDS”!

Tuesday, August 21, 2012

Pear answers!!

A ripe pear is a sweet pear.

A little known fact about the pear is that it is one of the few fruits that does not ripen on the tree.  The pear is harvested when it is mature, but not yet ripe, and, if left at room temperature, it slowly reaches a sweet and succulent maturity as it ripens from the inside out.

As tempting as the pear might be right from the grocer’s stand, a little bit of patience and know-how will ensure the pear reaches its peak flavor.

So, how do you know when the pear has ripened to sweet and juicy perfection?

While a Bartlett’s skin color brightens as it ripens, most varieties of pears show little change in color.

The best way to judge ripeness for non-Bartlett varieties is to Check the Neck™: Apply gentle pressure to the neck of the pear with your thumb. If it yields to pressure, it’s ripe.  Easy, isn’t it?

Here’s what you need to do to ripen your pears:

  • Leave firm, unripe pears at room temperature so that they can ripen.
  • Check the Neck for Ripeness daily, by applying gentle pressure to the neck, or stem end, of the pear with your thumb. If it yields to pressure, then it’s ripe and ready to eat!
  • Once the pear is ripe, it can be refrigerated to slow the ripening process and saved for use up to five days later.
To Prevent Browning

Keep a fresh fruit fresh.
Like many fruits, the flesh of cut or peeled pears will eventually brown. This natural oxidation process won’t affect the taste or quality. However, to keep your pears looking appetizing and to prevent browning, dip them in a mild solution of 50% water and 50% lemon juice!

Refrigerating Pears

Remember, don’t refrigerate an unripe pear!
Ripened pears can be used at once or put under refrigeration (35º to 45º F) until you want to use them. Refrigeration will delay further ripening but will not stop it altogether, giving you adequate time to include fresh pears in your menu planning.  Remember, pears need to ripen at room temperature, so don’t refrigerate an unripe pear!

Speedy Ripening

Flavor well worth the wait
Place underripe pears in a fruit bowl at room temperature near other ripening fruit like bananas, which naturally give off ethylene and will help speed up the ripening process. And if you find yourself with a few too many overripe pears, blend them into smoothies, soups, sauces and purees!

Now what?

….and there are more to pick!
2012-08-21 07.10.522012-08-21 07.11.082012-08-21 07.11.31

Tomatoes!


2012-08-19 07.50.23

Thursday, August 16, 2012

Can’t forget the flowers!

2012-08-16 07.08.202012-08-16 07.08.282012-08-16 07.09.042012-08-16 07.09.072012-08-16 07.09.12

Monday, August 13, 2012

Tomato update

The front of the raised bed!

2012-08-11 12.06.06

The rear of the raised bed!

2012-08-11 12.06.33

Waiting to see what this is!

2012-08-11 12.04.44

Yum… little tomatoes slightly bigger than cherry tomatoes.

2012-08-11 12.05.04

So what the heck are tomatillos?  We’ll see!

2012-08-11 12.05.28

Sunday, August 12, 2012

Raspberries–gotta get them planted!!

This looks like a good idea!!
Raised beds eliminate root rot

The original 20 plants have grown into a full bed from which the author picks 2 gallons of raspberries a day during the summer months, roughly a pint per plant, though the amount tapers off as fall approaches.

Raspberry plants hate wet feet, and they are gross feeders. We addressed these two critical points by building a 20-inch-high raised bed and filling it with a mixture of four-fifths good garden topsoil blended with about one-fifth sand, peat, and well-rotted manure. If, like us, you have acidic soil, you will also need to add some lime, because raspberries prefer a soil pH of around 6.0. We left one end of the box open to allow easy access with our wheelbarrows, then closed it in when the box was full. This job can be done in the fall, so you are ready to plant, come spring.

If you have rich, deep soil that drains well year-round, you can simply plant your raspberries in a permanent garden site. Not us. The Pacific Northwest gets rain all winter, and many gardeners lose raspberries to root rot because they make the mistake of planting their raspberries' fussy little toes directly in the ground, which is often soggy clay covered with a skim of topsoil. We also experience a two-month drought most summers. Raised beds allow us to have deep soil that holds moisture evenly yet drains well.

It is important that you do not establish your raspberry patch in an area where you have recently grown tomatoes, peppers, or potatoes, to avoid verticillium wilt, which these vegetables can carry, and raspberries can catch.

Holy tomatoes! …look at all these colors!

Striped and Bi-Colored Tomatoes

  • Big Rainbow - These 2 pound tomatoes have green shoulders, a yellow midsection, and neon red streaks running through them. Terrific slicing variety.
  • Copia - This newer open-pollinated variety that's an extremely unique-looking tomato. The skin has fine striping of brilliant gold and neon red. The flesh is swirled red and yellow. It's juicy and flavorful.
  • Green Zebra - A favorite chef's variety that's extremely striking in color with yellow-gold skin and stripes of lime green. It has a rich, sweet flavor that gives just a little bite - excellent taste.
  • HillBilly (Flame) - This is a 4" - 6", yellow, flattened fruit with rose "flames" on its skin and throughout the flesh. It's been described as meaty, creamy, rich, and sweet. It's also crack-resistant and makes a gorgeous slicing tomato.
  • Isis Candy Cherry -This is a sweet and fruity cherry tomato that comes in different shades with blushed patterns on them. Usually they have a "cat's eye" at the blossom end.
  • Marizol Gold - This German heirloom from the 1800s. These are flattened, deeply ribbed, red and gold bicolor tomatoes. It's a prolific producer with delicious flavor.
  • Mary Robinson's German Bi-color - This is a large, yellow fruit that with lots of red shading and stripes. It's sweet and mild in flavor.
  • Old German - Southern Exposure Seed Exchange introduced this Mennonite family heirloom in 1985. It has outstanding flavor and its color is yellow with a red center through the whole tomato. The fruits often weigh more than a pound.
  • Pineapple - This 2 pound tomato is beautiful to serve with its yellow skin and red marbling. It has a sweet and fruity flavor.
  • Striped Roman (Speckled Roman) - Striped Roman is an amazing-looking variety that you'll never recognize as a tomato. The fruit's unique shape is cylindrical, 3" x 5" long, and pointy. Their base color is red, but they have wavy yellow stripes. It's a meaty and excellent-flavored tomato.

Black, Purple, and Brown Tomatoes

  • Black from Tula - This rare Russian heirloom ties for best-tasting black with Black Krim. The deep, purple-brown variety is a large, 8-12 ounce tomato with a rich, sweet, and spicy flavor.
  • Black Krim - This is one of the best of the black tomatoes. It's a very juicy, dark red-purple fruit from Russia and was named for the Crimean peninsula in the Black Sea.
  • Black Prince - This black-chocolate brown heirloom comes from Siberia. It has a deep and sweet flavor that's wonderful on salads.
  • Cherokee Purple - This is a pre-1890 Cherokee Indian heirloom tomato that's an old favorite. It's a dark, purple-pink color and has a fabulously sweet flavor.
  • Eva Purple Ball - This German heirloom is a lovely and terrific performer in hot growing zones. The fruits are a rich, pink-purple color and weigh 4-5 ounces.
  • Gypsy - This colorful fruit is named for the Russian gypsies. It's a very deep purple-maroon color and has great flavor.
  • Paul Robeson - This Russian variety was named in honor of the black opera singer and Russian equal rights advocate. It's an extremely popular variety with seed collectors and connoisseurs. It's black-brick in color and has a smoky, sweet, rich flavor that's hard for gardeners to resist.
  • True Black Brandywine - Here's one for the collectors out there. Apparently, True Black Brandywine came from the Quaker family of the renowned William Woys Weaver. This black-purple tomato dates back to the 1920s. The delicious fruits that have a sweet, earthy flavor.
  • Violet Jasper or Tzi Bi U - This delicious, high-yielding little fruit is an absolutely gorgeous violet-purple color striped with an iridescent green.
  • Vorlon - This heirloom is from Bulgaria but named after a fictional alien race. This lovely purple-black tomato has a rich, smoky, organic flavor. Baker Creek Heirloom Seeds introduced it this year.

White Tomatoes

  • Cream Sausage or Banana Cream - Cream Sausage produces white to light yellow, sausage-shape fruits have a nice, sweet flavor. It's perfect for salsas and makes a lovely cream-color cream sauce.
  • Great White - This creamy white, beefsteak tomato weighs in at 1 pound and is smoother than most of the beefsteak types. Baker Creek describes the flesh as tasting so fruity that it reminds them of a mix of fresh pineapple, melon, and guava.
  • Ivory Egg - This is a rare cream-color tomato that comes from Sweden. Ivory Egg has the shape and size of a chicken egg and the flesh is sweet and rich in flavor.
  • Shah/Mikado White - These creamy-white fruits are flattened globes with a hint of blush at the blossom end when they're ripe. They have a seriously sweet flavor with a hint of pear.
  • White Queen - This almost white, 3 pound, round, and flat tomato has ribbed shoulders and possibly some pink streaks on the blossom end. Make a fabulous white pasta sauce.
  • White Tomesol - Those gourmet gardeners are going to love this heirloom. The fruit is a beautiful, cream-color and has a wonderful fragrance. It has exceptionally sweet flavor.
  • White Wonder - This white tomato variety was chosen for the famous Chez Panisse restaurant owned by Alice Waters. These are medium-size, creamy white fruits that have a sugary-sweet flavor and are easy to grow.

Another mystery weed…

popping up in the training area…

2012-08-12 19.29.122012-08-12 19.29.31

Monday, August 6, 2012

Note to self…

Do not plant in pots!  They dry out WAY too fast!

Follow up note to self...   Planting in pots is ok if you have a pot that doesn't dry out and something to put it on/in to hold water for plant to absorb it.

Dehydrating!


Leftover chili,
carrot tops ( a good substitute for parsley flakes) and
green peppers (25 dehydrated to make what is in that jar!)

2012-08-04 03.12.02

Friday, August 3, 2012

Clearly growing!!

The mystery plant growing in the seldom used driveway south of the house!

2012-08-03 21.46.312012-08-03 21.45.482012-08-03 21.45.57

Now that’s a garden!!

My neighbor and my go-to person…  I guess you would say “mentor” with this whole gardening thing!

2012-08-03 21.50.36   2012-08-03 21.50.46   2012-08-03 21.50.49   2012-08-03 21.51.09   2012-08-03 21.51.22   2012-08-03 21.51.37   2012-08-03 21.51.40