Monday, July 23, 2012


100 degrees today…
…well 97 but heat index over 100… I’m glad I got up and watered my plants at 6am… where DO we live… certainly NOT in WI!
Sunday, July 22, 2012
This help I don’t need…
So I turned the water on so the soaker hose would start watering the tomatoes and then I left for a bit to check on my neighbors puppies. When I returned Jake had escaped from the house by moving a board I had blocking the dog door and was having a blast with the hose. He had ripped the one side out creating a stream of water which he was playing with… it could have been worse.. the water could have been going on to the tomatoes which I’m sure then that is where Jake would have been! Brita was new to the mess as I brought her out not realizing that the trouble maker was already out!


Saturday, July 21, 2012
Rain…
ok… this is the 3rd day this week that rain was heading toward us and it either never got here or sent south of us…. Out to water again…
Wednesday, July 18, 2012
Look what popped up ….
…in the driveway to the side yard…. must have been from the pumpkins and squash I threw on the hill above it because that was the only place the dogs wouldn’t get at them for a snack! Looks like one bigger plant with a small one near it and then another one a little bit away!


Sunday, July 15, 2012

Saturday, July 14, 2012
Sometimes you just forget the obvious…
Spent this morning trying to figure a way to configure my hoses so I only have to turn on one faucet and everything gets watered... Thank you Ari for all the old hoses that were chewed in half that make great soaker hoses! Forgot one important thing that I'll have to think through...
…water does not run UPHILL....

Back to the drawing board!


Friday, July 13, 2012


HHmmm……
I really should have labeled things better… these are in a raised bed… will just have to wait and see!


Thursday, July 12, 2012
Blueberry bushes…
So the grass was growing around the bushes – 2 of which were planted for me while I was in the hospital… Someone mentioned cardboard around them so I soaked it in the pool and put it around the bushes… so far so good! And Brita was such a help!


Friday, July 6, 2012
The blackberry bush…
…what happened to it?!?! OK.. so it’s not the best planting job but I just had hip surgery… and Brita just had back surgery! I think something ate it!

Wednesday, July 4, 2012

Friday, May 25, 2012
Grow a Potato Tower
Thanks to Gardner Scott for this article http://gardenerscott.blogspot.com/2012/03/grow-potato-tower.html
Potatoes are easy to grow in a vegetable garden. They can be started in cool weather so spring is a great time to plant, a couple weeks before your last frost date. Chit them, plant them, follow standard garden habits, and in a few months you dig up your harvest.
A typical potato harvest
I've written previously about some concerns with potatoes in a home garden. With standard growing methods you devote a lot of space for little comparable payout. There are many other delicious vegetables and fruits that you can grow in the same space for a better investment. In other words, it's far cheaper to buy a 20-pound bag of potatoes from the grocery store than to grow the same quantity, and unlike many crops like tomatoes and squash, potatoes from the garden don't taste much different than store-bought.
Potatoes are a crop that shouldn't be grown in the same spot as the previous year. You should actually rotate the locations on at least a three-year cycle to avoid some diseases and soil issues. This can be difficult for many gardeners with small gardens.
Potatoes grow deep and like to be planted in loose, well-amended soil. Preparing the planting bed can be hard work and keeping the soil evenly moist through the growing season requires a lot of water and attention.
Another concern arises at harvest. Using a spade or garden fork to dig up the potatoes invariably results in some sliced and speared tubers. It's hard to dig up all of the potatoes damage-free. I've tried many techniques and always injure some of my crop, regardless of how careful I am.
All of these issues can be dealt with by growing potatoes vertically, in a potato tower. A small space and big payout, easy rotation, easy maintenance, and easy harvesting make this an ideal method for growing potatoes.
The concept is simple: you start potatoes in an enclosed vertical planter and add soil and compost as the plant grows. Many potatoes will grow roots and ultimately new tubers wherever the main stalk is covered with soil. A seed potato planted in a garden bed will give you a handful of potatoes at harvest. If that same plant is covered with soil when it is about eight inches tall (20 cm), it will produce tubers at the original harvest depth and again at the new level. If covered with soil when it reaches eight inches again, it will produce another harvest level.
A tower three or four feet (1 to 1.3 meters) tall can multiple the quantity of potatoes that a single plant normally produces. A small planting footprint gives you a harvest comparable to a large planting bed. Just two pounds of seed potatoes can give you more than 20 pounds at harvest.
I begin making a potato tower with welded metal fencing four feet tall. A piece 12 feet long (3.6 meters) makes a tower about four feet wide when the ends are attached together. A potato tower four feet tall and four feet wide can hold many tubers. The wide tower is very stable and won't tip over like slender ones can.

A simple metal potato tower
I select an unused spot in my garden for a tower. Since it needs just a four-foot space it can be almost anywhere. The base soil is amended and loosened as deep as possible. In this soil, I plant the prepared seed potatoes about 4 inches deep (10 cm) and 12-15 inches apart (30-40 cm) within the four-foot ring. You can plant closer together but the final potatoes will be smaller.
Water to keep the soil moist and in a few weeks there will be potato plants growing within the tower. When the plants are about eight inches tall cover with soil, though I prefer a mix of straw and compost. The straw and compost will not weigh as much as soil and stays within the open-wire ring better. Also, it retains moisture very well and reduces the amount of watering the tower needs. If you choose to use a well-amended soil for each new level, you'll need to support the tower with rebar stakes and wrap it with fabric or plastic to keep the soil from spilling out.

Layers of straw and compost are the growing medium
Keep evenly watered and in no time the plants will be about eight inches tall again. Cover with more straw and compost. Continue this process two or three times. Ultimately you'll have 32 or 40 inches (.8 - 1.2 m) of soil or straw and compost inside the ring. You've effectively created a potato taproot more than three-feet long (1 meter) with tubers growing along the entire length.

Add more compost and straw as they grow
Keep the plants watered throughout the summer and during flowering. A few weeks after they flower they'll turn yellow and begin to die back. Stop watering at this point and let the plants rest for a week or two.

Potato plants dying back
My favorite part of growing a potato tower comes at harvest. A couple weeks after the dieback, the ends of the metal fencing are released and the entire contents of the tower spill out. At this point it's very easy to pluck the potatoes from the soil and loose compost and straw. Not a single tuber is pierced, sliced, or damaged in any way.

Peeling back the straw reveals the harvest
Another huge benefit of a potato tower is revealed at that point too. The compost and partially decomposed straw mix are perfect amendments for my garden soil. Turning it into the existing soil at that spot makes it suitable for new plants in the next year -- just not more potatoes. An out-of the-way garden location has just been primed for more crops.
The tower can be constructed with many other materials. Some gardeners use old tires. Plant the seed potatoes and cover the spot with an auto tire. When the plant reaches the top of the tire, fill it with soil and stack a new tire on top. Continue stacking until the tower is four or five tires high. At harvest just remove the tires to reveal the tubers.
You can also make a planting square with cinder blocks. You follow the same basic procedure of adding soil and stacking a new level of cinder blocks. At harvest, just one wall of the tower needs to be removed to access the crop. If you have carpentry skills you can built a wooden box with removable slats for your tower.
Growing potatoes in your garden, particularly in a tower, gives you great flexibility with which varieties of potato you choose. However not all potatoes will grow new tubers along the entire taproot. Some varieties like Russet will provide a bountiful harvest. Red Pontiac and fingerling potatoes do well. Others like Yukon Gold will not. I prefer Yukon Gold on my dinner table so even though I use the tower method I don't need to fill the tower more than a few feet tall because it won't increase the quantity at harvest.
Typically, indeterminate potatoes should do best in a tower. I haven't found a definitive authority or list identifying all of the varieties that will work so if you have a favorite potato try it in a tower and let me know your results.
A potato tower allows you to create a new planting bed without dedicating prime gardening real estate; you can save your raised beds and open rows for other crops. It gives you great flexibility in how many potatoes you grow and where you put them. After harvest the same tower can be used again the next year for a new crop, ideal garden recycling.
If you grow potatoes, consider a potato tower. You may never revert to the old system again.
Sunday, May 20, 2012
Toma Verde TOMATILLO (HEIRLOOM)
Toma Verde TOMATILLO is adapted to grow successfully in a wide range of climates, and is a large-fruited, 3' - 6' tall variety. These papery-husked wonders prefer growing conditions somewhat similar to tomatoes (and are related to a tomato),  but will handle a lot more heat than tomatoes. Grows quickly and produces in both southern and northern climates. Used in a wide variety of Mexican foods.
This packet plants approximately 40 plants.
Days to Emerge: 10 days
Seed Depth: 1/4”
Seed Spacing: A group of 3 seeds every 18”
Row Spacing: 3’
Thinning: When 2” tall thin to 1 every 18”
When to sow outside: 2 to 4 weeks after average last frost, and when soil temperatures are warm.
When to start inside: RECOMMENDED. 4 to 6 weeks before average last frost.
Harvesting: Fruits should be harvested when they almost fill the husk, but are still green in color; the husk will change from green to tan. Fruit at the bottom of the plant ripens first. If left on the vine too long, and allowed to turn yellow or purple, they lose their unique flavor.

Sunday, April 22, 2012
Growing Strawberries :)
Strawberries are an easy to grow fruit crop that will reward the home gardener with ample harvests for many years. With favorable conditions, each strawberry plant should produce one quart of strawberries. 
Choosing Strawberry Plants …. There are basically 3 types of strawberry plants to choose from: June bearing, Everbearing and Day Neutral.
Mulching the Strawberry Bed - Mulch between plants after planting to keep the soil temperature cool, deter weeds and to keep the fruit off the soil. Straw is the traditional strawberry mulch. Do not use black plastic since it will raise the soil temperature and optimal fruit production requires cool soil.
In colder climates, mulching over the strawberry plants will prevent injury to the crowns. Wait until the temperature drops to 20 degrees F. and cover with several inches of straw or pine needles. Be sure to use a mulch that can be easily removed in the spring.
Strawberry Water Needs - 1 - 2 inches of water per week is needed for juicy fruit. Water is especially important while the fruit is forming, from early bloom to the end of harvest.
Fertilizing Strawberries - Start with a rich, organic soil. Apply a balanced fertilizer (10-10-10) at planting at the rate of one pound per 100 sq. ft. Fertilize again after renovation of June bearers or second harvest of day neutrals and everbearing types. Do not over fertilizer or you will have excessive leaf growth and poor flowering. Do not fertilizer strawberries late in the season in colder climate to prevent new growth that will be damaged by frost.

Take note: Joanne gave me 5 plants that are doing well on the porch… looking for a place in the yard now.
Choosing Strawberry Plants …. There are basically 3 types of strawberry plants to choose from: June bearing, Everbearing and Day Neutral.
- June Bearing strawberries produce a single, large crop per year during a 2 - 3 week period in the spring. June bearers are the traditionally grown plants, producing a single flush of flowers and many runners. They are classified into early, mid-season and late varieties. The largest fruits are generally from June bearing varieties.
- Everbearing strawberries produce two to three harvests of fruit intermittently during the spring, summer and fall. Everbearing plants do not send out many runners.
- Day Neutral strawberries will produce fruit throughout the growing season. These strawberries also produce few runners. Everbearing and day neutral strawberries are great when space is limited, but the fruits are usually somewhat smaller than June bearers.
- Full sun
- Well drained, sandy loam with a soil pH from 5.8 to 6.2 is ideal
- Don't plant where tomatoes, potatoes, peppers or eggplant have been grown recently (Verticillium Rot)
- Plant in the spring as soon as the soil is dry enough to be worked, or in late fall
- Be sure you have certified disease-free plants
- Select plants with large crowns with healthy, light-colored roots
- Amend soil with 1-2 inches of organic matter like compost or well- rotted manure
- Keep weeds from competing with your strawberry plants
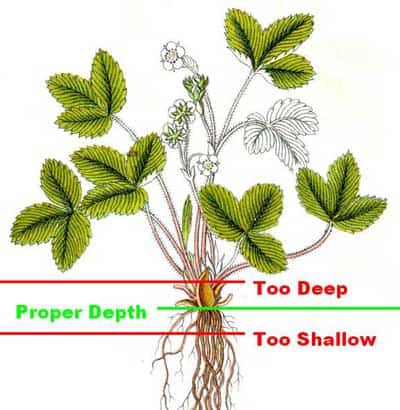
- Make a hole large enough to spread the roots. Hill the center of the hole and place the crown at soil level. Spread the roots downward on the hill. Bury the plant so that the soil only goes halfway up the crown.
Mulching the Strawberry Bed - Mulch between plants after planting to keep the soil temperature cool, deter weeds and to keep the fruit off the soil. Straw is the traditional strawberry mulch. Do not use black plastic since it will raise the soil temperature and optimal fruit production requires cool soil.
In colder climates, mulching over the strawberry plants will prevent injury to the crowns. Wait until the temperature drops to 20 degrees F. and cover with several inches of straw or pine needles. Be sure to use a mulch that can be easily removed in the spring.
Strawberry Water Needs - 1 - 2 inches of water per week is needed for juicy fruit. Water is especially important while the fruit is forming, from early bloom to the end of harvest.
Fertilizing Strawberries - Start with a rich, organic soil. Apply a balanced fertilizer (10-10-10) at planting at the rate of one pound per 100 sq. ft. Fertilize again after renovation of June bearers or second harvest of day neutrals and everbearing types. Do not over fertilizer or you will have excessive leaf growth and poor flowering. Do not fertilizer strawberries late in the season in colder climate to prevent new growth that will be damaged by frost.

Take note: Joanne gave me 5 plants that are doing well on the porch… looking for a place in the yard now.
Thursday, April 19, 2012
Health Benefits of " Dandelion "
1 ) Cancer: Dandelion root extract is unique, and is one of the only things found to help with chronic myelomonocytic leukemia and It is effective in treating breast tumors.
")
2 ) Detoxification of vital organs: Because of the diuretic abilities of dandelion root, it is beneficial for flushing out the liver, kidneys and gallbladder. İt works great to purify the blood and cleanse the system. This also makes it a good herb for fighting infections. It is also used for arthritis, osteoarthritis , gout and rheumatism.
3 ) Dandelion tea actively ameliorates disease—it is a potent disease-fighter—and helps the body heal, helps boost immunity and heart disease, and age-related memory loss.
4 ) Treating anemia: Because of the high content of iron in dandelion root, it is beneficial for building red blood cells in the body to treat anemia.
5 ) Treating diabetes: Dandelion root has been shown to lower blood sugar levels in patients. In Europe, it's used to treat Type-1 and Type-2 diabetes.
6 ) Digestive system: D
 andelion root, when made into a tea, is beneficial for relieving constipation, flatulence and fullness.
7 ) Treating high blood pressure : Dandelion root is a natural diuretic. When combined with its high potassium content, it is an effective treatment to lower blood pressure.
8 ) Dandelion tea helps reduce high cholesterol.
9 ) High nutritional value: Dandelion root contains vitamins A, B-complex, C and D as well as the minerals iron, zinc and potassium. This combination of vitamins and minerals also makes dandelion root a high antioxidant food.
10 ) Mood enhancer: Due to the high amount of vitamin B-complex, dandelion root can help to stabilize mood and treat depression.
11) It is very beneficial to menopausal women.
12 ) Dandelion root is also used to treat skin disorders such as acne, eczema and psoriasis.
13 ) Laxative: Dandelion root is also a mild laxative and is used to help with regularity.
14 ) Dandelion tea helps with weight control—especially with weight loss.
(Composting spent dandelion tea blossoms, leaves, and/or roots, after drinking your dandelion tea, improves soil composition.)
(There are very few side effects linked to using dandelion root. Allergic Reactions to the herb have been reported. People taking prescription lithium, a diuretic, medication to lower blood pressure or medication to lower blood sugar should not take dandelion root. Women who are Pregnant or Breastfeeding should consult their doctor before taking this herb.)

Tuesday, April 17, 2012


")
")


")
Subscribe to:
Comments (Atom)